Showing posts with label Party Food. Show all posts

Wednesday, November 9, 2011

Rosemary Roasted Cashews


This is a Barefoot Contessa recipe.  I just love her!  She one of those people that I feel like we could be great friends if we ever met.  I mean after all we have so much in common.  We are fabulously rich, have a mansion in the Hampton's, adore our husbands, and love to cook.  OK, so we have two things in common, we adore our husbands and love to cook.  She has so many great recipes that I make and most of them are pretty simple.  I am starting to plan my Thanksgiving menu and this is going to be one of the appetizers I sit out. They are so good with the fresh rosemary and have such a special Holiday feel.  I am going to share my exact menu with you tomorrow and the recipes I have tested.  I will also suggest recipes I have previously tested that I know are great.  If you have any request for a recipe you'd like me to try please let me know.  I hope this helps you get ideas for your Thanksgiving meal!  Stay tuned!

Tips:

If you can't find unsalted cashews, you can use salted,  just omit the salt called for in the recipe.

Ingredients:

1 pound roasted cashews, unsalted
2 tablespoons chopped fresh rosemary
1/4 teaspoon cayenne pepper
2 teaspoons dark brown sugar
2 teaspoons kosher salt
1 tablespoon melted butter

Preheat oven to 375 degrees.

Place nuts on an ungreased baking sheet and bake for about 5 minutes or warmed through.

In a medium bowl combine butter, rosemary, cayenne pepper, brown sugar, and salt.  Toss the warm nuts with the rosemary mixture until the nuts are coated.  Serve warm or at room temperature.

Enjoy!

Friday, October 28, 2011

Cookies and Cream Cupcakes


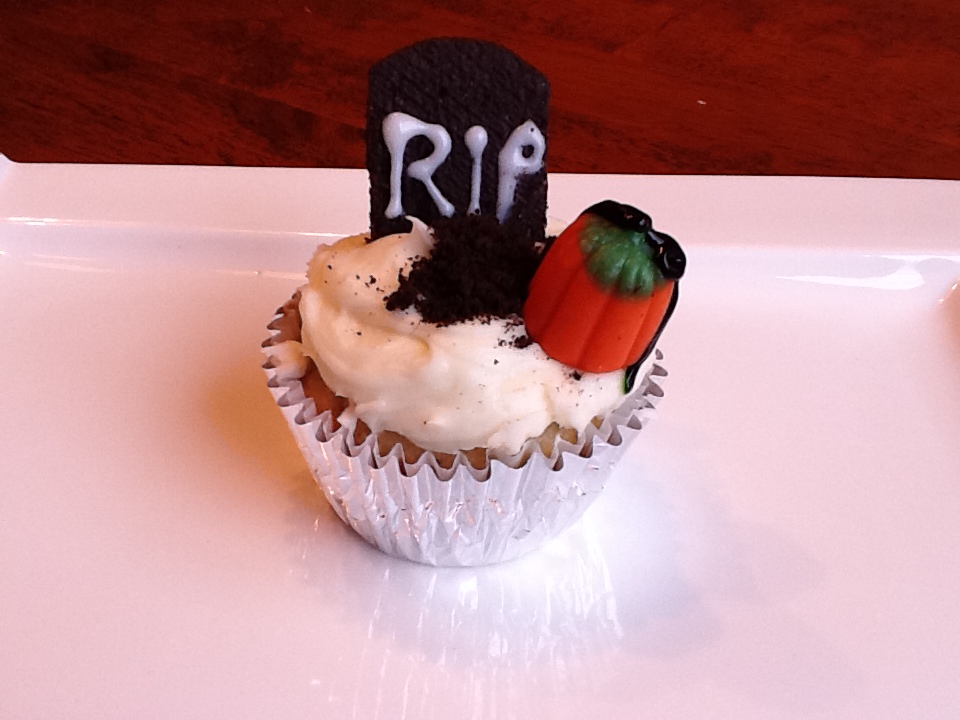
I love Oreos!!!!  I am really kind of obsessed with them.  There is just something so good about that simple little cookie.  But these cupcakes are like Oreos on steriods.  Oreo half on the bottom, chunks of oreos inside and a rich cream cheese frosting.  YUM!  These are easy to make and who ever you make them for, share them with, will love you!  You'll love yourself too!  The picture above is a Halloween spin on these but the picture on the bottom is how I usually make them.  Your gonna love these!

Tip:

I save the egg yolks and make a big omelet for all of us the next morning.
Ingredients:

24 Oreo halves, with cream filling attached
2¼ cups all-purpose flour
1 tsp. baking powder
½ tsp. salt
8 tbsp. unsalted butter, at room temperature
1 2/3 cup sugar
3 large egg whites, at room temperature
2 tsp. vanilla extract
1 cup milk
15 Oreo cookies, coarsely chopped

Cream Cheese Frosting
Directions:
Preheat the oven to 350˚ F. 

 Line  two cupcake pans with 24 cupcake liners.  Place an Oreo halve in the bottom of each liner, cream side up.  In a medium bowl, combine the flour, baking powder and salt; stir together with a fork to blend and set aside.  In the bowl of an electric mixer, combine the butter and sugar and beat together on medium-high speed until light and fluffy, about 2 minutes.  Blend in the egg whites one at a time, beating well after each addition.  Blend in the vanilla extract.  With the mixer on low speed, beat in half of the dry ingredients just until incorporated.  Add the milk and beat just until combined, then mix in the remaining dry ingredients.  Gently fold in the chopped Oreos with a rubber spatula until evenly incorporated, being careful not to over-mix.
Evenly divide the batter between the prepared cupcake liners.  Bake for 20 minutes, or until a toothpick inserted in the center comes out clean.  Allow to cool in the pans 5-10 minutes, then transfer to a wire rack to cool completely.

Cream Cheese Frosting

1 (8 ounce) package cream cheese softened
1 stick butter, salted
1 teaspoon vanilla
4 cups powdered sugar

To make the frosting, combine the cream cheese and butter in the bowl of an electric mixer and beat on medium-high speed until smooth, about 1 minute.  Blend in the vanilla extract.  Beat in the confectioners’ sugar until incorporated and smooth, 1-2 minutes.  

Enjoy!


recipe adapted from Annie's Eats.

Tuesday, October 25, 2011

Candy Corn Butterfinger Bars


When I saw this recipe I knew I had to make it.  My husband's favorite candy bar is Butterfingers.  I was so excited to make these for him.  These are so easy it's crazy and they only have 3 ingredients!  They taste just like the real thing!  These would be perfect for Halloween and after to use up all the candy corn your kids get.  To bad they don't sell candy corn all year!

Ingredients:

1 pound candy corn
16 ounces peanut butter
16 ounce package candy quick chocolate candy coating

Directions:

Line a 8 x 8 inch pan with parchment paper or wax paper.

Place candy corn in a large microwave safe bowl.  Microwave for 1 minute, then stir.  Continue microwaving, stirring every 15 minutes, until smooth.  This should take about 1 1/2 to 2 minutes.  Immediately stir in peanut butter.  Mixture will become very thick.  Spread in prepared pan.  Cool completely. Cut into desired squares.

Melt chocolate candy coating according to package directions.  Dip butterfingers squares into chocolate and place on waxed paper to set.

Enjoy!

Tuesday, October 18, 2011

Candy Corn Bark


This is the easiest thing to make.  I'm making this for my daughter's Halloween get together but it makes a great snack too.  I'm not sure who ate more of it my husband or kids.  =)  I have all kinds of variations on this to share with you for the Holidays, so stay tuned.

Ingredients:

18 ounces of white chocolate ( I use Baker's white chocolate squares), chopped
1 cup pretzels, broken into pieces
2 cups candy corn

Directions:

Cover a large baking sheet with waxed paper.

Place chocolate in a microwave safe bowl.  Microwave for 30 second intervals, stirring after each one, until chocolate is melted.  This will take about 2 minutes total.  Be careful not to burn the chocolate.

Stir in pretzels and 1 1/2 cups candy corn.  Spread mixture onto wax paper making a large rectangle.  Top with remaining 1/2 cup candy corn.

Let cool until chocolate hardens again.  (You can speed this process up in the fridge) Cut into large squares, then in half, creating triangles.

Enjoy!

Friday, September 30, 2011

Slow Cooker Pork and Pinto Bean Nachos


This is one of the easiest recipes ever.  Throw it all together in a slow cooker and in 8 hours you have the best nacho topping or taco filler.  I told ya it was easy!  I hope you all have a great weekend!

Tips:
I have also used chicken pieces and beef stew meat instead of the pork.  This isn't super spicy, if you like a lot of heat you can add a little cayenne pepper too.

Ingredients:

1 pound dried pinto beans
1 pound boneless pork chops
1 teaspoon garlic powder
1/2 teaspoon onion powder
1 1/2 teaspoons chipotle chili powder
1 teaspoon salt
1 teaspoon ground cumin
1 (32 ounce) carton + 1 can reduced sodium chicken broth ( If using regular, reduce salt)
1  can Rotel
All your favorite nacho toppings: cheese, sour cream, jalapenos, etc.

Directions:

Rinse and sort beans.  Place in slow cooker and top with pork chops.  Add remaining ingredients.

Cover and cook on low 8 hours.  Take two forks and shred pork into beans.

Enjoy!

Thursday, September 29, 2011

Apple Spiced Caramel Popcorn


I have been obsessed with popcorn ever since I made the chocolate popcorn over a month ago.  I have been making this caramel popcorn for a long time and it is always a huge hit with the whole family.  I wanted to add some fall flavor so I added some apple pie spice and I *love* how it turned out.  Just the right hint of apple and spice with the sweetness of the caramel.  This popcorn is absolutely wonderful without the spice too.  I would really like to blame my children for how quickly this popcorn went but I would be a big popcorn stuffed liar.  This makes a great snack but I think this is such fun party food too.  Perfect to serve at  a Halloween party.


Tips:
I think this would be great with pumpkin pie spice too.  This would be fun to serve for guests to snack on while Thanksgiving dinner is being prepared.  


If you like your popcorn lightly coated use 3 bags, if you like it heavily coated (as myself) use 2 bags of popcorn.


Ingredients:


  • 1 cup butter
  • 2 cups brown sugar
  • 1/2 cup corn syrup
  • 1 teaspoon salt
  • 1/2 teaspoon baking soda
  • 1 teaspoon vanilla extract
  • 1 1/2 teaspoon apple pie spice
  • 2-3 bags of popped microwave popcorn

Directions:

Preheat oven to 250.  Place popcorn in a large bowl.

In a medium saucepan over medium heat, melt butter.  Add brown sugar, corn syrup, and salt.  Bring to a boil, stirring constantly.  Boil 3 minutes.  Remove from heat and stir in vanilla extract, apple pie spice and baking soda.

Pour over popcorn tossing well to coat.  Spread onto a large baking sheet.  Bake at 250 for 45 minutes tossing every 15 minutes.

Let cool before breaking into pieces.  I find this step very difficult. =)

Enjoy!


Friday, August 12, 2011

Chocolate Popcorn


I made it through Lilly's first day of preschool!  Barely, but I made it.  Lilly is my 4 year old and she has been home with me since the day she was born.  She has been my constant companion and I love every minute of it.  She is a very precocious red head and she provides me a lot of entertainment.  So her being at school two days a week seems like, excuse my drama, the end of the world.  I know this is a great thing for her and will allow me to have special time with my almost 2 year old son.  I will adjust, right?  I decided to make her a special after school snack for her first day.  We all loved this popcorn.  It is so good!  It's got me wanting to play around with more popcorn flavors.  The sweet and salty combination has always been a favorite of mine.  Next time I think I 'll throw in some M&M's for some color and extra bling. =)


Ingredients:

12 cups popped popcorn
1 cup sugar
2/3 cup light-color corn syrup
1/2 cup butter
1 cup semisweet chocolate pieces
1 teaspoon vanilla

Directions:

Remove all unpopped kernels from popped popcorn.  Place popcorn in a 17 x 11 x 2-inch baking or roasting pan lined with foil or parchment paper.

Preheat oven to 300 degrees.  In a medium saucepan, combine sugar, corn syrup, and butter.  Cook and stir over medium heat until mixture boils.  Remove pan from heat.  Stir in chocolate pieces and vanilla until chocolate is melted.

Pour the hot chocolate mixture over popcorn; stir gently to coat.  Bake for 45 minutes, stirring mixture gently every 15 minutes.  Spread mixture on a large piece of foil.  Cool completely.  Store coated popcorn, tightly covered, for up to 1 week.

Enjoy!


I'm linked up at:
http://sweet-as-sugar-cookies.blogspot.com/2011/08/sweets-for-saturday-30.html
http://www.wellseasonedlife.com/2011/08/sweet-indulgences-sunday-17.html
http://www.alli-n-son.com/2011/08/11/sweet-tooth-friday-guest-post-chocolate-chip-cookie-cupcakes/
http://mangoesandchutney.com/2011/08/fat-camp-friday-40-cranberry-chicken-salad.html
http://momscrazycooking.blogspot.com/

Tuesday, July 5, 2011

Baked Zucchini Fries


I hope all of you had a wonderful holiday weekend!  I sure did. (Thanks Aunt Bev!) However, with that usually comes some indulgent food choices so I thought I better make some healthier recipes this week to reign myself back in.  I did love every bite though!

I am not the greatest of gardeners, matter of fact I am pretty bad at it.  I'm not so good with the whole weeding thing. This year I bought some zucchini plants.  My brother planted them for me in my Dad's garden and my Dad has done all the weeding for me.  I think it has worked out quite well.  I have never grown it before and I had no clue how big the plants get.  Wow!  And they produce alot of zucchini! Good thing I love it.  There are so many things you can do with it, this is just one of many. These are awesome! They are crisp on the outside and juicy on the inside.  And there is no guilt with these!  These are perfect served with some marinara or ranch.  Bake some up tonight!

Ingredients:
2 medium zucchini, sliced into sticks
1 large egg white
1/3 cup seasoned bread crumbs
1/4 tsp. garlic powder (optional)
cooking spray
salt and fresh ground pepper

Directions:
Preheat the oven to 400 degrees F.  Cut zucchini into thin sticks.
In a small bowl, beat the egg white and season with salt and pepper.
In a Ziplock bag, place the breadcrumbs and garlic powder; shake well to combine the mixture.
Spray a cookie sheet with cooking spray and set aside.  Dip the zucchini sticks into the egg and then place into the bread crumb bag, a few at a time and shake to coat.  Place the breaded zucchini in a single layer on your prepared cookie sheet.  Repeat with all of the remaining zucchini sticks.  Spray more cooking spray on top of the zucchini sticks.
Bake for 20 – 25 minutes, or until golden brown.  Serve with some marinara sauce for dipping.

 Enjoy!

Monday, July 4, 2011

Star Spangled Ice Cream Sandwiches


Happy 4th Y'all!  These make a great treat for kids and they are the easiest things to put together ever!  You can also change up the colors for a birthday celebration or party anytime of the year.

Ingredients:

Ice Cream Sandwiches
Sprinkles
Popsicle sticks

Directions:

Insert Popsicle sticks into each ice cream sandwich. 
Press exposed filling into a plate of sprinkles. Freeze until ready to serve.

Friday, July 1, 2011

Barbecue Deviled Eggs


These are my own original recipe for deviled eggs minus the BBQ.  Adding BBQ to deviled eggs is an old southern classic.  They go well with so many things!  Try them sometime without the BBQ.  They are the only deviled eggs my hubby will eat. =)


Ingredients:


12 large eggs
1/4 cup mayonnaise
1 heaping teaspoon horseradish mustard
1/4 teaspoon salt
1/4 teaspoon pepper
1/8 teaspoon hot sauce
1/3 cup finely chopped barbecued pork
paprika and dill pickle for garnish, optional


Place eggs in a single layer in a large saucepan; add water about 2 inches above eggs. Bring to a boil; cover, remove from heat, and let stand 15 minutes.
Drain and fill pan with cold water and ice. Tap each egg on the counter and roll back and forth. Peel under cold running water. 
Cut eggs in half lengthwise, and carefully remove yolks. They should pop right out. Beat egg yolks and next 5 ingredients with an electric mixer until smooth. Gently stir in pork.
Spoon yolk mixture into egg white halves.
Chill until ready to serve. Garnish, if desired.


Enjoy!

Thursday, June 30, 2011

Red, White, and Blue Dipped Strawberries


Aren't these cute?  I had a tough time making these.  Not because they are hard to make, because they couldn't be easier.  Because my children couldn't keep their little hands off of them.  Actually, I'm pretty guilty too.  They are yummy!  They make a great dish to bring to a party or potluck.  These would be perfect for a bridal or baby shower too.  All you have to do is tint the white chocolate with food coloring or change the color of the sugar. 

Ingredients:
12 ounces white chocolate
Strawberries
Blue sugar or edible glitter

Instructions:

 Melt 12 ounces of white chocolate chips in a microwave according to the package directions (make sure the container and the berries are dry; even a little moisture will alter the texture of the candy).
One at a time, dip strawberries into the chocolate and then into blue sugar or edible glitter.
Set them to harden on waxed paper. 


Enjoy!

Tuesday, March 29, 2011

Caramel Apple Dip

I love caramel apples. Let's be honest, not to many people don't. But they are kind of hard to eat. Especially for kids. This dip taste just like a caramel apple. This recipe is so easy and absolutely delicious! It makes a great appetizer, snack, or dessert.  Great way to get everyone eating fruit!


Ingredients:


25 individually wrapped caramels, unwrapped.
1/4 cup of water
1 (8oz.) package cream cheese
1/2 cup brown sugar


In a microwave safe bowl, melt caramels and water, slowly, stirring often. I did 40 second intervals.


In a medium size bowl cream together cream cheese and sugar until smooth. Fold in caramel mixture and beat until smooth. Serve with apple slices or whatever fruit you like! Can be refrigerated until ready to serve. Serves 8.


Enjoy!

Wednesday, February 9, 2011

Chocolate Dipped Pretzel Bouquets

With Valentine's Day quickly approaching I decided it was time for some sweet recipes. I made one of these bouquets for each of my children. They already ate them so I guess I will be making more for the actual holiday. They are super easy to make and really a darn tasty little treat. My husband has been out of town all week. =( So I have done very little gourmet cooking. It was more about surviving. When the cats away the little mice will play and try to get away with as much as possible.  Anyways, I have some great recipes planned for y'all in lieu of Valentine's Day. I have a decadent breakfast recipe that you can make your loved one this weekend and serve them in bed. (That ought score some points, huh?) A gourmet dinner to wow them with, a fabulous dessert, and a chocolate sugar cookie that will keep you out of the dog house for years to come. My husband and I will be celebrating our anniversary this weekend so I will post the dinner on Sunday. I have always said I show love through food. It really is a great way to say "I love you". Don't want to sit in a busy restaurant on Monday? Make your honey a romantic meal at home.


Ingredients:
1 bag of pretzel rods
regular and white chocolate almond bark
Valentine’s Day themed sprinkle candies

1. Melt almond bark in microwave according to package directions. Dip pretzels in chocolate. We spooned the chocolate onto the pretzels to get the pretzels more covered in the chocolate.
2. Sprinkle with candy sprinkles right after dipping pretzels in chocolate. Lay on wax or parchment paper and let harden.

Enjoy!
By the way, I got these cute little vases at the dollar store.


Saturday, February 5, 2011

Baked Buffalo Wings with Two Sauces

Ahhh... the quintessential game day food.  Hot wings.  This recipe was requested by a good friend of mine.  He doesn't have a deep fryer so he wanted a baked version.  I love a good food challenge!  Can baked wings be as good as their evil, fried counterparts?  My professional taste tester (my husband) says yes.  That's good enough for me!  We Americans love them.  Even though there is not much meat on those little bones.  That doesn't stop us from sucking those bones dry, does it?  Now days when you go to a wing joint, there are so many flavors to choose from.  Chicken wings are typically fried then coated in the sauce.  I baked mine in the oven and they came out so crispy and delicious.  Then I tossed them in the different sauces.  You'll never know they weren't fried.  That's not to say they are healthy.  Let's just go with it and then run tomorrow.  Actually you run, I hate running.  I'll just eat a couple more sticks of celery. That counteracts it, right?

Ingredients:

5 pounds chicken wings
2 tablespoons neutral oil
salt and pepper
1 1/2 cups all- purpose flour

Preheat oven to 400 degrees.

Line a baking sheet with foil.  Brush oil on baking sheet.

Rinse the wings and pat them dry with a paper towel.  In a large bowl, toss the wings in the flour.  Salt and pepper the wings.  Place the chicken wings on the prepared baking sheet.  Bake in the oven for 30 minutes. With tongs, turn chicken over and bake for another 15- 20 minutes or until golden brown.  Toss in sauce of your choice.

Buffalo Wing Sauce:

1 stick butter, melted
1 cup hot sauce ( I used Frank's Red Hot Sauce)

Heat butter and hot sauce in a small saucepan until combined.

Honey Barbecue Sauce:

1 cup barbecue sauce
1/2 cup honey
2 tablespoons ketchup
2 tablespoons hot sauce
4 tablespoons butter
1/2 teaspoon garlic powder

Simmer together on low while wings bake.

Enjoy!

Friday, February 4, 2011

Baked Mozzarella Cheese Sticks

My kiddos love mozzarella cheese sticks! We order them a lot as an appetizer when we eat out. Which honestly, with three kids and a dutch husband is not very much. =) So I decided to start making these at home. I have both fried and baked them. They are more decadent fried but still have great crispiness when baked. Since my kids request them often I usually bake them. Less mess to clean up and healthier for my kids. I serve them with marinara or ranch.


Ingredients:
  • 12 Mozzarella cheese sticks (the individually wrapped kind for snacking)
  • 1/2 cup flour
  • 2 egg whites, whipped until very soft peaks
  • 1 cup panko crumbs
  • 1/4 teaspoon garlic powder
  • 1/2 teaspoon Italian Blend Dried Herbs (oregano, basil, marjoram, thyme, rosemary, savory, and sage)
  • non-stick cooking spray                                                                                                                                                                                       
    Preheat oven to 400 degrees. Unwrap cheese and cut in half if desired. Make a bowl for the flour. Whip the egg whites until they have soft peaks and leave them in a bowl. Then combine panko, garlic powder, and dried herbs in another bowl. Dip the cheese in the flour, then the egg whites and then roll in the panko. Try to press the panko on the cheese stick to make it adhere better. 
Place the cheese sticks on a cookie sheet sprayed with non-stick spray. After all the cheese sticks have been made, Spray more non-stick spray on top of them, lightly, to help browning.


Bake at 400 degrees until golden brown, about 15- 20 minutes. Serve with marinara.


Wednesday, February 2, 2011

Homemade Jalapeno Poppers

My husband and I love jalapeno poppers. I tried a frozen version at the grocery store and they just didn't cut it. So I thought I would have to make them myself. These are great served with ranch dressing for dipping. I do HIGHLY RECOMMEND TO WEAR GLOVES WHILE PREPARING THE JALAPENOS. The heat from the peppers can burn your hands, and your face if you touch it, and the pain can last quite a while. I know, I have done it, more than once (you would have thought I have learned the first time). Now I always keep a box of vinyl gloves (powder free) on hand for preparing peppers. But also be sure not to touch yourself with your gloved hands either. Before filling the peppers I blanch them.


Definition of BlanchingTo plunge foods into boiling water for a few minutes, then remove and place in ice water. This process sets the color of vegetables, lets you easily peel fruits, and slip the skins off nuts. The food does not cook all the way through, so crisp texture is preserved.


So back to the peppers. I stuffed the peppers with half cream cheese, and half Mexican blend cheese, mixed with a bit of seasoning. I then dipped the peppers in milk, then flour, then back in the milk, in the panko, back in the milk again, and then in the panko for a second time. So it is once in the flour, and twice in the panko. You want to make sure to get a good breading on them so that the cheese doesn’t come out when you fry them.
The frying process is very quick. Make sure not to walk away after you put them in the oil, they will take just a couple of minutes.  Get ready to impress your game day guests!

Ingredients:
1 8 oz. package cream cheese, softened
1 cup mexican cheese blend
1 teaspoon Smokey Mtn. spice, or your favorite southern spice blend
1 cup milk
all- purpose flour
panko
oil for frying

Blanch peppers in bpoiling water and then place in ice water to cool . Once cool remove and drain on papertowels.
WEAR GLOVES. Prepare jalapenos while wearing gloves. Cut them in half lengthwise, and remove seeds and the white ribs inside the peppers. DO NOT AT ANY TIME TOUCH YOURSELF WITH YOUR GLOVED HANDS. The heat from the peppers will also clear your sinuses. Place prepared peppers on a cookie sheet.Mix softened cream cheese, shredded cheese, and seasoning blend.Don’t remove those gloves just yet. Place cheese in peppers and mound up a little.Prepare your bowls of milk, flour, and panko. . Dip each pepper in the milk, then flour, then milk, then panko, then milk, then panko. Repeat the milk and panko if needed to cover up the pepper and cheese.Place each breaded popper back on the baking sheet and preheat the oil to 350 degrees. Fry each pepper for 2-3 minutes, until. browned, but not so much that the cheese starts to escape. Serve with ranch or salsa.

Enjoy!


Notice I do eventually learn. Gloves.


Yum!

Tuesday, January 18, 2011

Buffalo Chicken Nachos

In our house, it's GO BIG BLUE! Now depending on who you're talking to, that can mean two entirely different things. Mine is the the Kentucky Wildcats. My husband's is the Michigan Wolverines. Both Big Blue. The one thing all sports fans can agree on is you gotta' have good game day food. I'm really not that into sports, but I love game day food. My favorite? Wings, of course. These nachos give you all that good wing taste and more, with no little bones to deal with. Just in time for the Super Bowl!


Ingredients:
2 cups chopped or shredded cooked chicken
1 1/2 cups buffalo wing sauce
ranch flavored doritos or regular tortilla chips
3 cups shredded cheddar cheese
blue cheese
chopped celery

Layer the chips on a large oven safe platter. Combine chicken and wing sauce and spread over nachos. Top with shredded cheddar cheese, blue cheese, and chopped celery. Bake at 450 on the top rack for 7-10 minutes until cheese is melted.


Go Big Blue!

Thursday, January 13, 2011

Buttery Soft Pretzels

Ya know, like the ones your kids beg you for in the mall. That cost a whoppin' $3.00 each. My 3 year old loves those pretzels. So I decided to try and make them at home. We haven't had a need for the mall versions since! Not to mention, I can make a double batch for less then $3.00. They are so good and a lot of fun to make together. Well, I make, they eat. You can top them with a variety of toppings and dip them in whatever you like best. Adults love them as well. Just think about the next time your asked to bring chips and dip to a party and you show up with these instead. Who likes to go to the mall anyways? Oh wait, I do. =)

Dough :
2 1/2 cups unbleached all-purpose flour
1/2 tsp. salt
1 tsp. sugar
2 1/4 tsp. instant yeast
1 cup warm water (110 F) 


Topping:
1/2 cup warm water
2 Tbls. baking soda
Kosher salt/cinnamon & sugar/grated parmesan 


Dissolve yeast in warm water in bowl of stand mixer. Add sugar.  Add the flour, salt and mix till combined. Knead on setting "2" for 5 minutes. The dough will be slack. Form into a ball and flour the outside. Put the ball into a lightly floured bag. (I use a bread bag, but a gallon freezer bag will work.) Let dough sit for 30 minutes.


Lightly grease your working surface. Cut dough into 8 equal pieces. Let sit for 5 minutes. While you wait, mix 1/2 cup of hot water with 2 tbls baking soda in a medium sized shallow bowl.  Make sure you dissolve the baking soda well so you don't have spoltchy pretzels (This is what gives the pretzels their shiny, golden brown exterior). Roll each piece into 22-24 inch long rope. Form the pretzel as shown below. Dip into the baking soda bath and place on the baking sheets.  Allow them to rest, uncovered,  for 10 minutes. 


Bake at 450 for 8-10 mintues or until they are golden brown,  rotating pans mid way through.


Remove from oven and brush with butter several times. Sprinkle with Kosher salt, cinnamon sugar or whatever you like. 
If you would like to make the pepperoni cheese pretzels top with pepperoni slices before baking. When they are golden brown add shredded cheese and place back in the oven just until the cheese melts. 


Enjoy!


                            Make the holes and and big. They puff up.


                                  That's my happy 3 year old.
                                       All my happy kiddos.